7 min
Editing PDFs Without Uploading Them Anywhere
Most online PDF tools upload your file to a server. Browser-side tools do the same work locally. Here is the difference, and how to verify it yourself.
Four different things get called "image size", and mixing them up is why an upload gets rejected, a print comes out blurry, or a photo that looked fine on a phone turns into a 9 MB email attachment.
12 min read · updated 12 September 2026 · links to 12 tools
Before anything else, separate them, because almost every image problem is one of these being confused with another.
Dimensions are the pixel grid — 4000 × 3000. This is the only measurement the file really has. DPI is a number stored alongside the pixels that tells a printer how tightly to pack them; it changes nothing about the image. Aspect ratio is the shape, the width divided by the height, which decides what has to be cut off to fit a different shape. File size is how many bytes the file occupies, which depends mostly on the compression applied.
A request to "make this smaller" can mean any of the four. Working out which one is being asked for solves most of the problem before you open a tool.
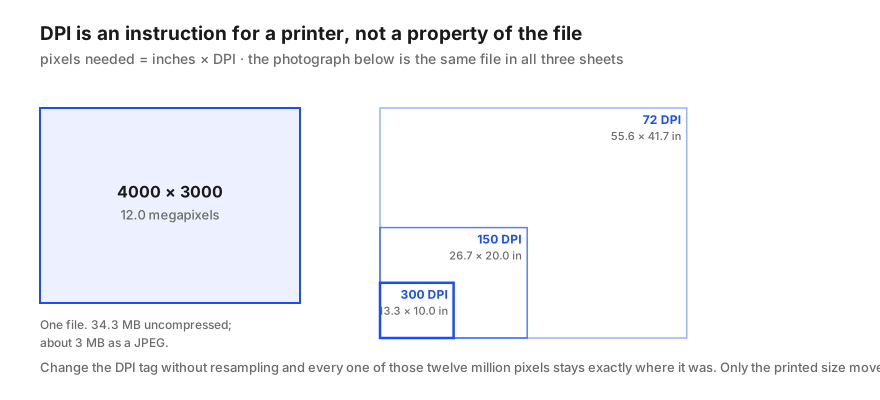
This is the single most common misunderstanding, and it is worth being blunt: changing the DPI number without resampling does not change your image. Every pixel stays exactly where it was. The only thing that changes is how large it comes out of a printer.
The relationship is one multiplication. Pixels = inches × DPI. So a 4000 × 3000 photograph at 300 DPI prints 13.3 × 10 inches, and the same file at 72 DPI prints 55.6 × 41.7 inches — much bigger, and much worse, because the same twelve million pixels are being spread over sixteen times the area.
This also means "save it at 300 DPI" is not something you can do to a small image to improve it. If a printer wants 8 × 10 inches at 300 DPI, it wants 2400 × 3000 pixels, and no metadata field will conjure them.
| Print size | At 300 DPI | At 150 DPI | At 72 DPI |
|---|---|---|---|
| 4 × 6 in | 1200 × 1800 px | 600 × 900 px | 288 × 432 px |
| 5 × 7 in | 1500 × 2100 px | 750 × 1050 px | 360 × 504 px |
| 8 × 10 in | 2400 × 3000 px | 1200 × 1500 px | 576 × 720 px |
| A4 (210 × 297 mm) | about 2480 × 3508 px | about 1240 × 1754 px | about 595 × 842 px |
Aspect ratio is width divided by height, reduced: 4000 × 3000 is 4:3, 1920 × 1080 is 16:9, a square is 1:1.
Changing the ratio means one of two things must happen, and it matters a great deal which. Cropping keeps the pixels it keeps and discards the rest — the subject stays the right shape, but part of the frame is gone. Stretching keeps everything and distorts it, which is why faces occasionally look wrong in a badly built banner.
The arithmetic is worth knowing before you crop. Taking a 4:3 photo into a 1:1 square keeps 3000 × 3000 and throws away a quarter of the picture. Taking the same photo to 16:9 keeps 4000 × 2250 and also throws away a quarter, from the top and bottom instead of the sides. In both cases, whatever you cared about needs to survive inside that region.
| Ratio | Where it turns up | From a 4000 × 3000 photo |
|---|---|---|
| 4:3 | most phone and compact cameras | the original, 12.0 MP |
| 3:2 | 35 mm film and most DSLRs | crop to 4000 × 2667 |
| 16:9 | video, monitors, wide banners | crop to 4000 × 2250, losing 25% |
| 1:1 | square social posts, avatars | crop to 3000 × 3000, losing 25% |
| 4:5 | tall social posts | crop to 2400 × 3000, losing 40% |
Pixel count grows with area, not with width, and this catches people out constantly. A 4000 × 3000 image is 12 megapixels. Halve both sides to 2000 × 1500 and it is 3 megapixels — a quarter, not a half.
That is good news for file size and it is why resizing is usually the right first move when something is "too big". Most images on the web are displayed at well under 2000 pixels wide, so a 4000-pixel original is carrying four times the data anyone will ever see.
Going the other way does not work. Enlarging invents pixels by interpolating between the ones you have, and while the file gets bigger, the detail does not come back. If a print needs 2400 × 3000 and you have 1200 × 1500, the honest answer is a smaller print.
A 4000 × 3000 image is twelve million pixels, and at three bytes each that is 34.3 MB of raw data. The JPEG on your phone is perhaps 3 MB, which is a compression ratio of about 11 to 1 — and it looks essentially identical, because JPEG discards detail the eye does not readily notice.
That is the key point: file size is not fixed by the dimensions. The same 4000 × 3000 photograph can be 8 MB or 800 KB depending only on the quality setting. So when an upload is rejected for being too large, there are two independent levers — make the grid smaller, or compress harder — and they can be used together.
JPEG quality is not a percentage of anything meaningful, so the only reliable approach is to try a setting and look at the result. Quality around 80 is usually indistinguishable from the original at normal viewing size while being a fraction of the bytes.
JPEG is lossy, and the loss happens at every save, not only the first. Open a JPEG, make a small change, save it, repeat — and the image degrades a little each time. This is generation loss, and it is why a picture that has been through a dozen shares and re-saves looks smeared around edges and lettering.
It matters most for anything with hard edges: text, screenshots, logos, line drawings. JPEG was designed for photographs, where detail is soft and continuous, and it handles a sharp black-on-white edge badly by creating a faint halo around it.
The habit that avoids all of it: keep your original, and export copies from it. Never edit the copy you exported last time.
The choice is mostly decided by what is in the picture rather than by preference.
| Format | Compression | Use it for | Avoid it for |
|---|---|---|---|
| JPEG | lossy | photographs, anything soft and continuous | text, screenshots, logos, transparency |
| PNG | lossless | screenshots, logos, line art, transparency | photographs — the files are very large |
| WebP | either | almost everything on the web; typically 25–35% smaller than JPEG at the same visual quality | workflows that must open in very old software |
| SVG | not applicable | diagrams, icons and charts — it is drawing instructions, so it is sharp at any size | photographs, which are not drawable as shapes |
Most cameras and phones write EXIF metadata into the file: the exact date and time, the camera model, the exposure settings, and on a phone very often the GPS coordinates of where the picture was taken.
That data travels with the file. Sending a photograph of something for sale, or a screenshot of a document, can hand over the location it was taken at without anyone intending it. Some social platforms strip metadata on upload and some do not, and there is no way to tell by looking.
The fix is small: look at what is in the file, and remove it before sharing if it should not be there. Both operations run entirely in your browser on this site — reading the metadata and stripping it never send the image anywhere, which for a file that contains your home coordinates is not a small detail.
Every image tool on this site runs in your browser using the Canvas API, so the file is never uploaded. That is a privacy property and also a limit: very large files are bound by your own device's memory, and results can differ slightly between browsers because the resampling is theirs, not ours.
None of these will recover detail that is not in the file. Enlarging, sharpening and "enhancing" all work with the pixels present; where the information was never captured, nothing can supply it.
Most online PDF tools upload your file to a server. Browser-side tools do the same work locally. Here is the difference, and how to verify it yourself.
Dead pixels, backlight bleed and IPS glow are three different things with three different verdicts. Here is what to check, and what counts as a defect.